My parent’s over-engineered smart home


You want the best for the people you love. When my parents were quoted over 12,000 CHF for a lame proprietary smart home system for their new house, I had to jump in. I suggested they purchase hardware for a quarter of that sum and create a much better setup. Enter my parent’s over-engineered smart home, a passion project I poured hundreds of hours in out of love and challenge.
If you’re lazy to read through the whole article and want a simple list of what I use, skip to the bottom!
Hardware
Let’s start with the hardware. While the house was being constructed, I met with the electrician and insisted on having RJ45 connectors in each room. I suggested to use category 6a cabling which supports up to 10 Gbp/s on 100m. To my surprise, it was the same price as the category 6 quoted initially. I added three extra Ethernet cables for the outdoor surveillance cameras as they were going to use Ethernet with PoE.
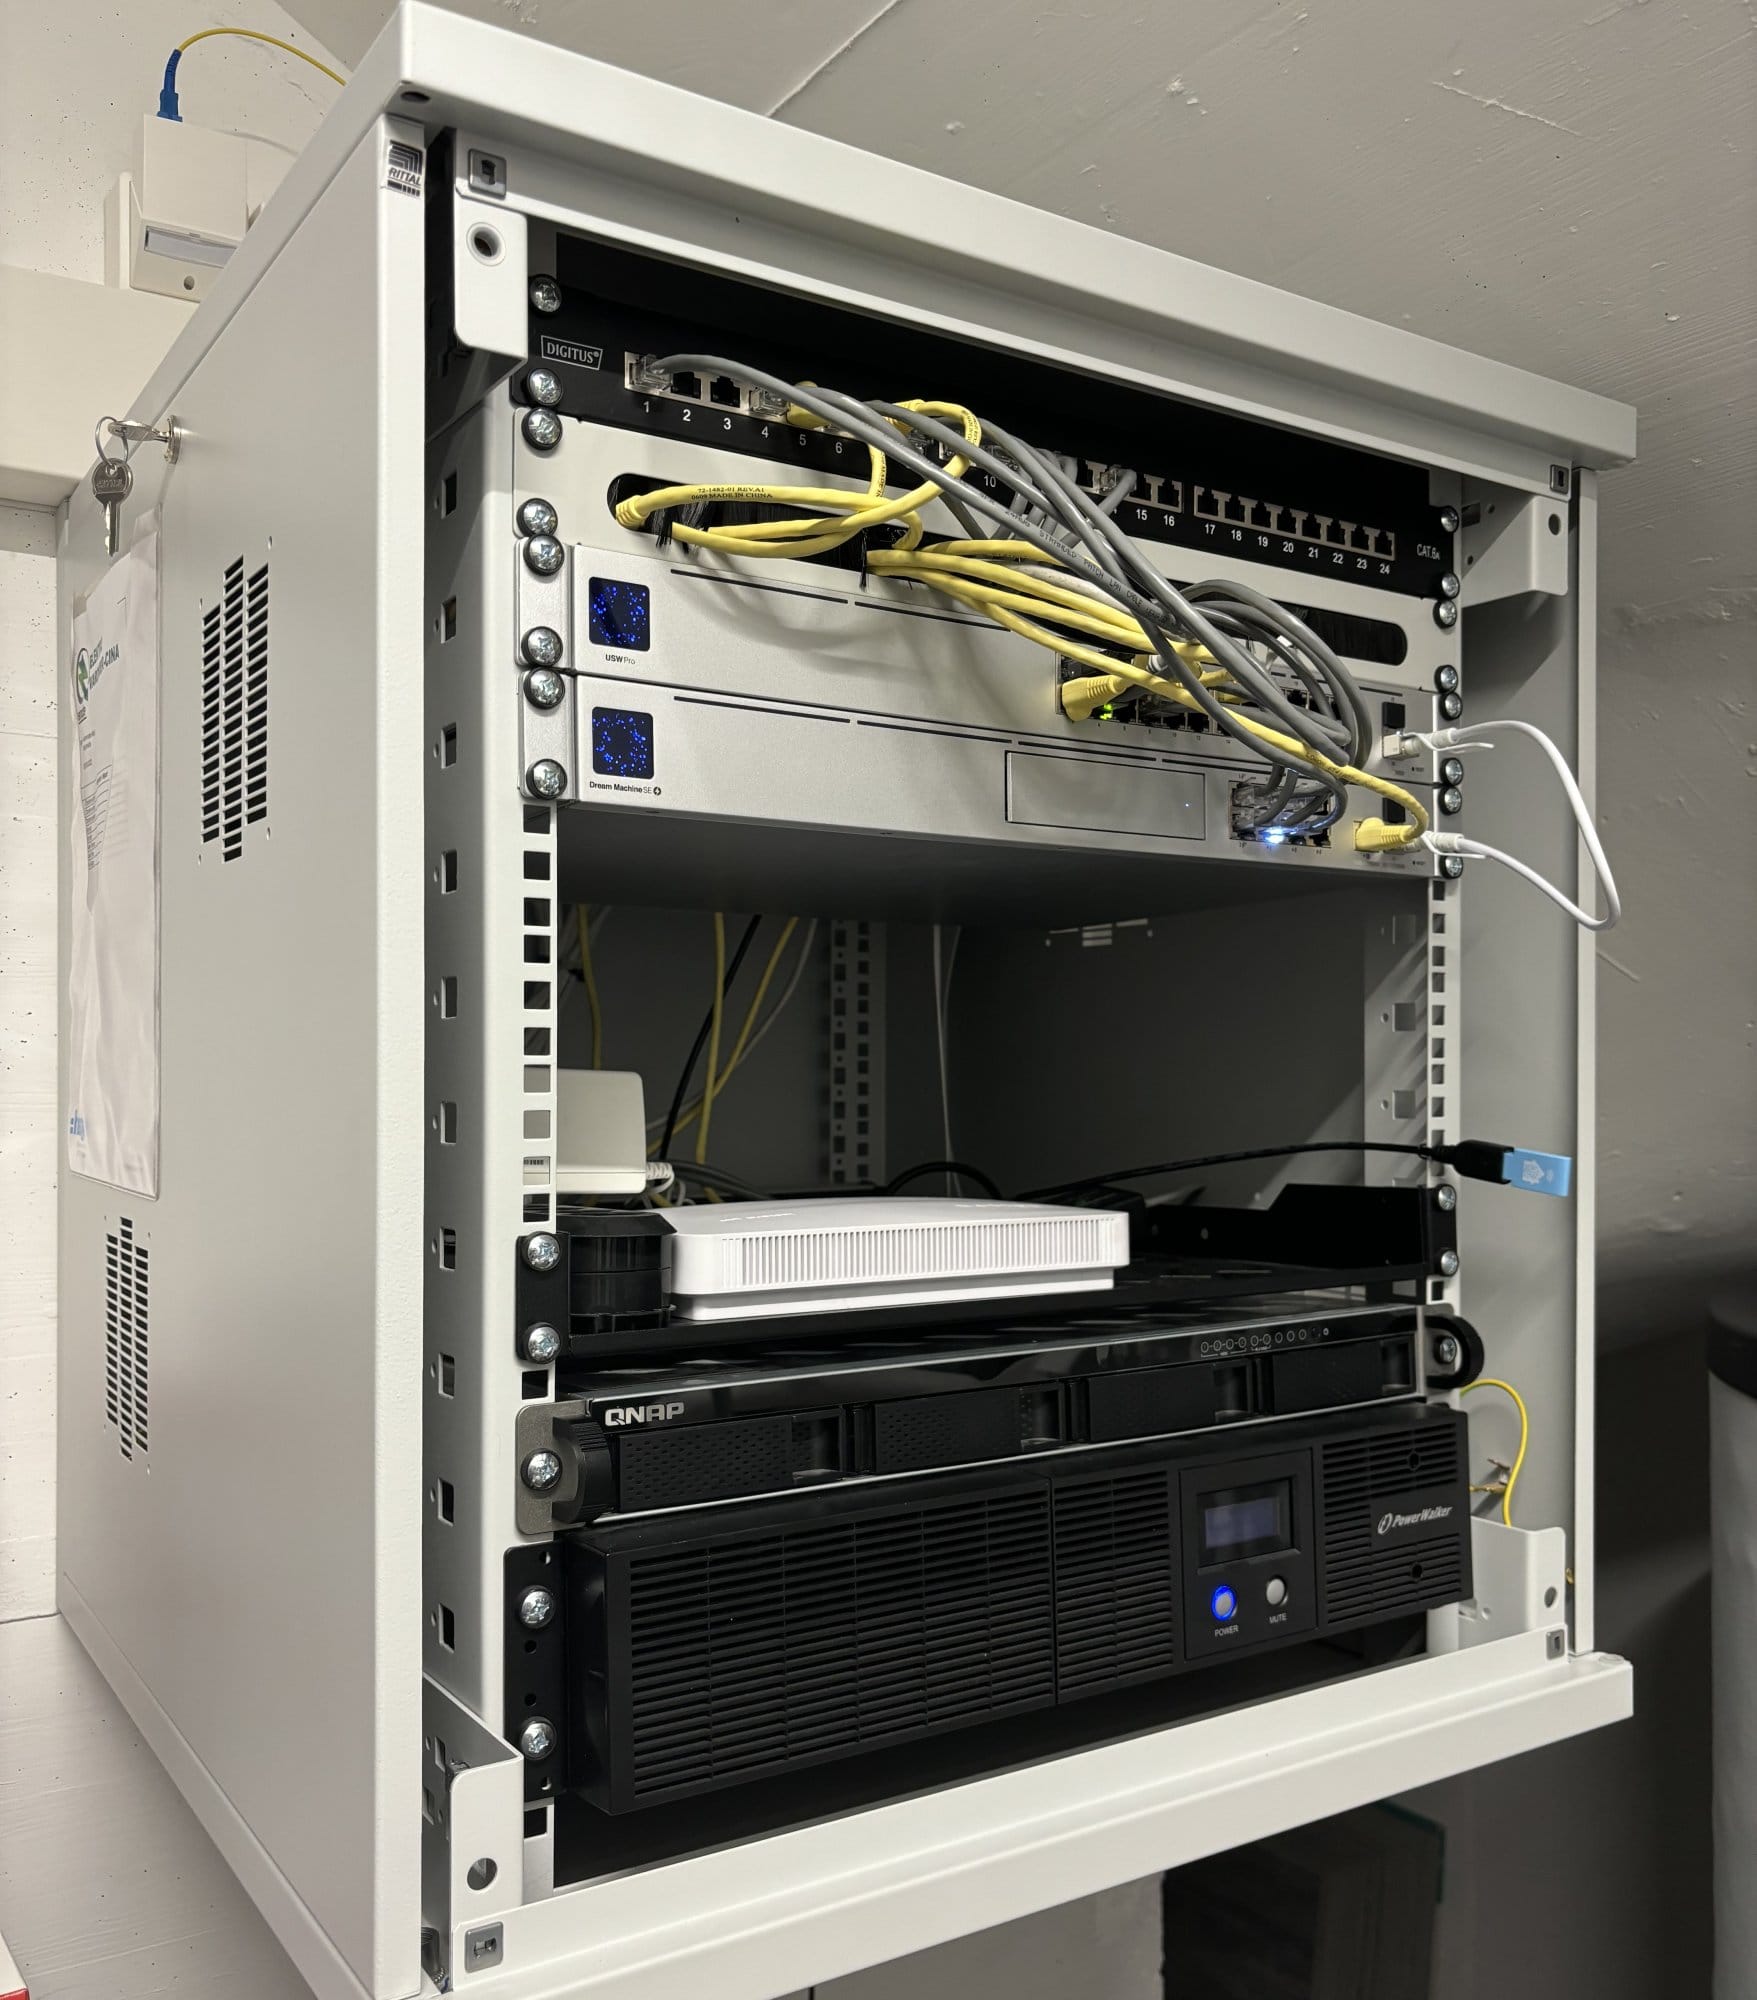
All the Ethernet cables terminate in a patch panel inside a network rack in the laundry room. Inside the rack we have:
- The ISP’s router. Would have loved to get rid of that one but you cannot use your own router if you’re a non-business customer.
- A Unifi Dream Machine Special Edition. Picked that one specifically for the PoE ports as I didn’t need many and a Unifi 24 ports PoE switch would have cost me more. This one is used as router and video recorder (for the cameras).
- A Unifi USW Pro 24 switch.
- A QNAP TS-464eU NAS/server. Small depth model, perfect for a network rack and can run x86-64 programs. Used to run all the applications and as storage.
- A PowerWalker VI 2200 RLE UPS. Just to make sure it doesn’t go all down when the power is cut.
Power wise, everything is connected on the UPS: the NAS, Unifi router and switch, and even the ISP’s router using a multi plug that can be connected to the UPS (like this one). This guarantees continued operation of the internet, surveillance cameras and server applications in case of power cut. The NAS shuts down automatically when the UPS operates on battery for an extended time, favouring the video surveillance over the applications.
Regarding to the network, the ISP’s router is connected on the WAN port of my Unifi router. It’s not possible to use it in bridge mode, unfortunately, and connecting the fibre directly to my router doesn’t work either despite having the hardware support for it. The ISP doesn’t want to as it’s reserved for their business offering, I didn’t look to much into it as it just worked with a transparent NAT to my router’s IP. Doing this, I can handle all the incoming traffic myself on the Dream Machine.
The Unifi router is connected to the switch with a 10 Gbp/s SFP+ link. On the router’s ports, I only connected the devices needing PoE such as the four cameras (3 outdoors (Unifi G4 Bullet) and 1 indoor (Unifi G5 Flex)) as well as the two access points (Unifi AC LR). The NAS has both Ethernet interfaces connected to the switch with aggregation. And the UPS is also connected to the switch via an add-on network card to monitor its status via SNMP.
There is an additional camera (Unifi G4 Doorbell) which serves as intercom for the door connected to the Wi-Fi. The view is a bit redundant as it is covered by another wired camera, but that is done on purpose as I did not want to leave any blind spots in case of jamming or de-auth attacks.
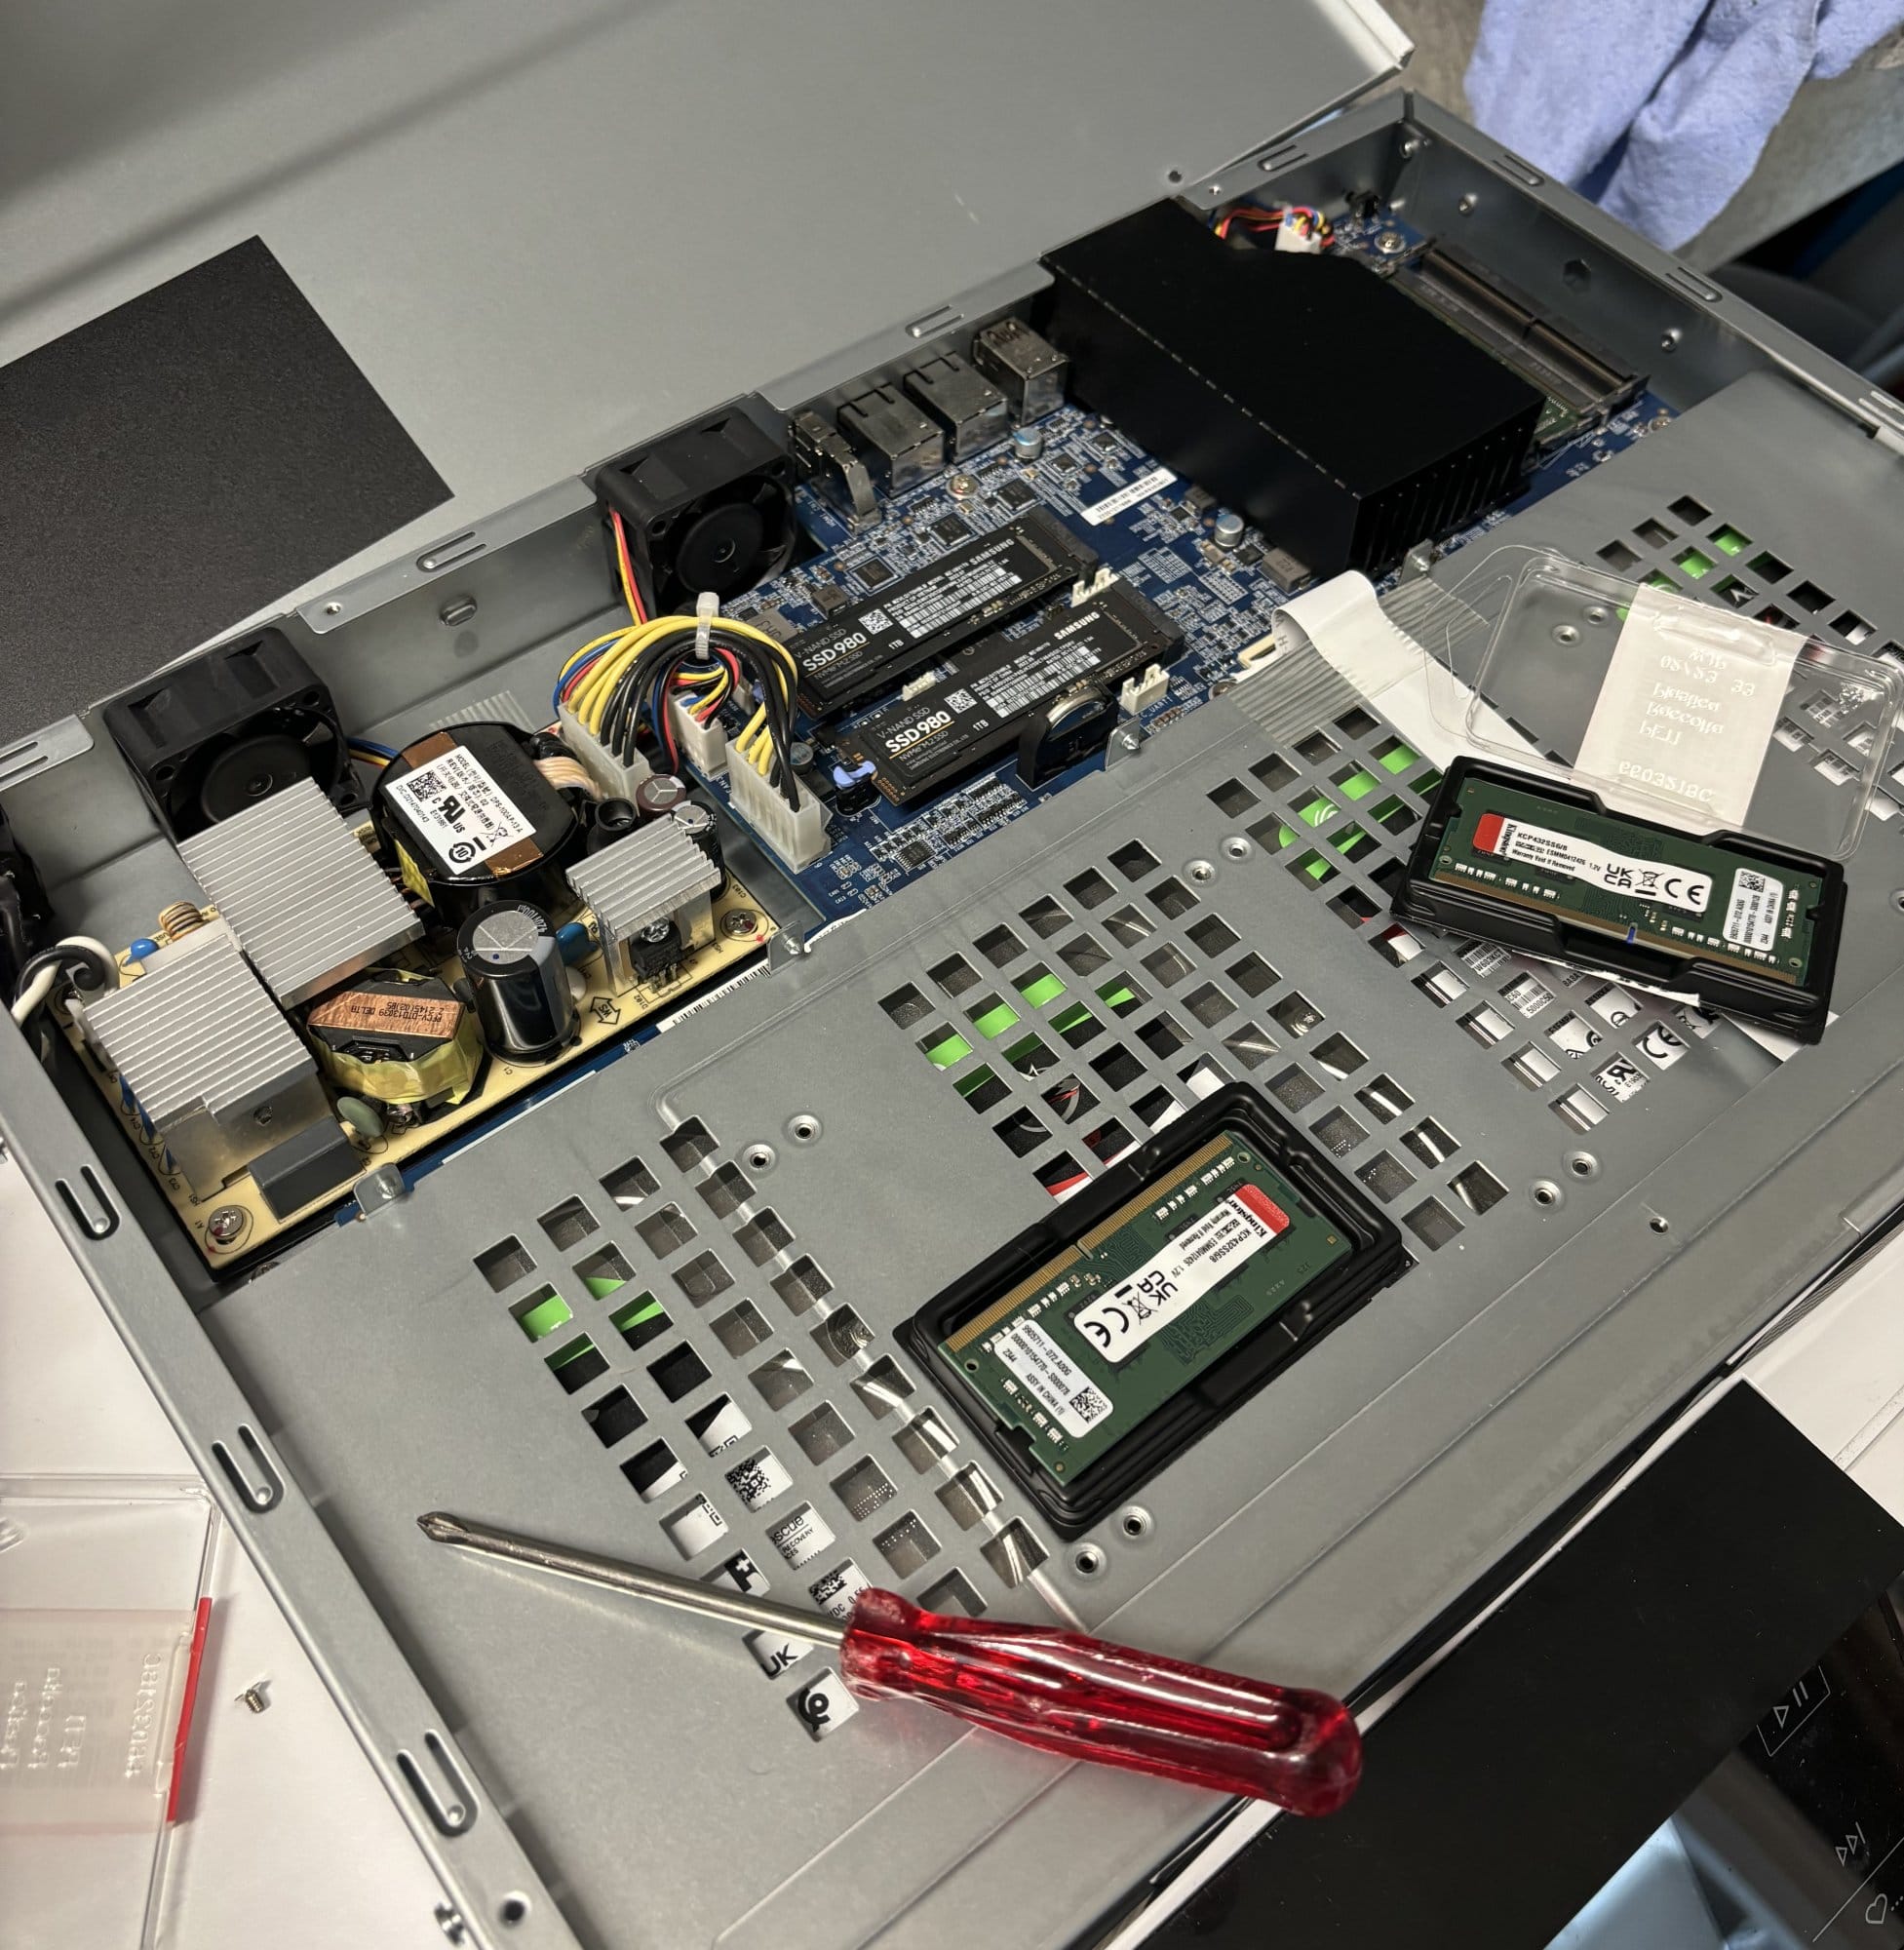
The brain of the whole house is the NAS, a QNAP TS-464eU with four 4TB hard drives in RAID 5 for data storage, two 1TB m2 SSDs in RAID 1 for applications and upgraded to 16GB of RAM. It has a Home Assistant SkyConnect (Zigbee) and the UPS connected via USB. Most applications are run on Docker, with some installed natively.
The last piece of hardware I want to cover is the tablet used to interact with the smart home. I used a Samsung Galaxy A8 tablet with a wall mount from Displine to have it constantly charged. I was quite happy with the latter despite it being on the more expensive side. It offered a stylish mount with the possibility to take the device out.
Software
All the network and camera management is done with Unifi’s network controller directly on the UDM Pro SE. It provides a pretty straightforward and comprehensive way to configure my network and cameras but frustratingly lacks some important features. For example, it is not possible to program the UDM Pro SE to shut down via SNMP or Serial/USB in case the UPS battery runs low. If the UDM is not shut down properly, it can lead to video recordings getting corrupted. Also, it is impossible to save video recordings on an external storage (local or cloud). I guess this was done to favour Unifi’s own hardware (UPS and UNVR).
Two other features that are greatly lacking but I was luckily able find great alternatives for are DNS and VPN. For the former, no management interface is available at all. There is only a functionality that can be enable to filter malicious traffic. I setup an AdGuard Home server on my NAS to handle DNS requests, offering filtering and rewrite for some local DNS entries.
VPN on the other hand is available on Unifi but works really poorly with too few configuration options. I was not able to get OpenVPN nor Wireguard working properly on my setup, turning to built-in solutions such as Teleport but the unreliability of the app made me again look for alternatives. That’s where Tailscale came into the rescue on my NAS. Easy to install and configure, and the free plan is really generous for the needs of a single user like me. Connected all my devices and set up the NAS as an exit node, has been working like a charm since day one.
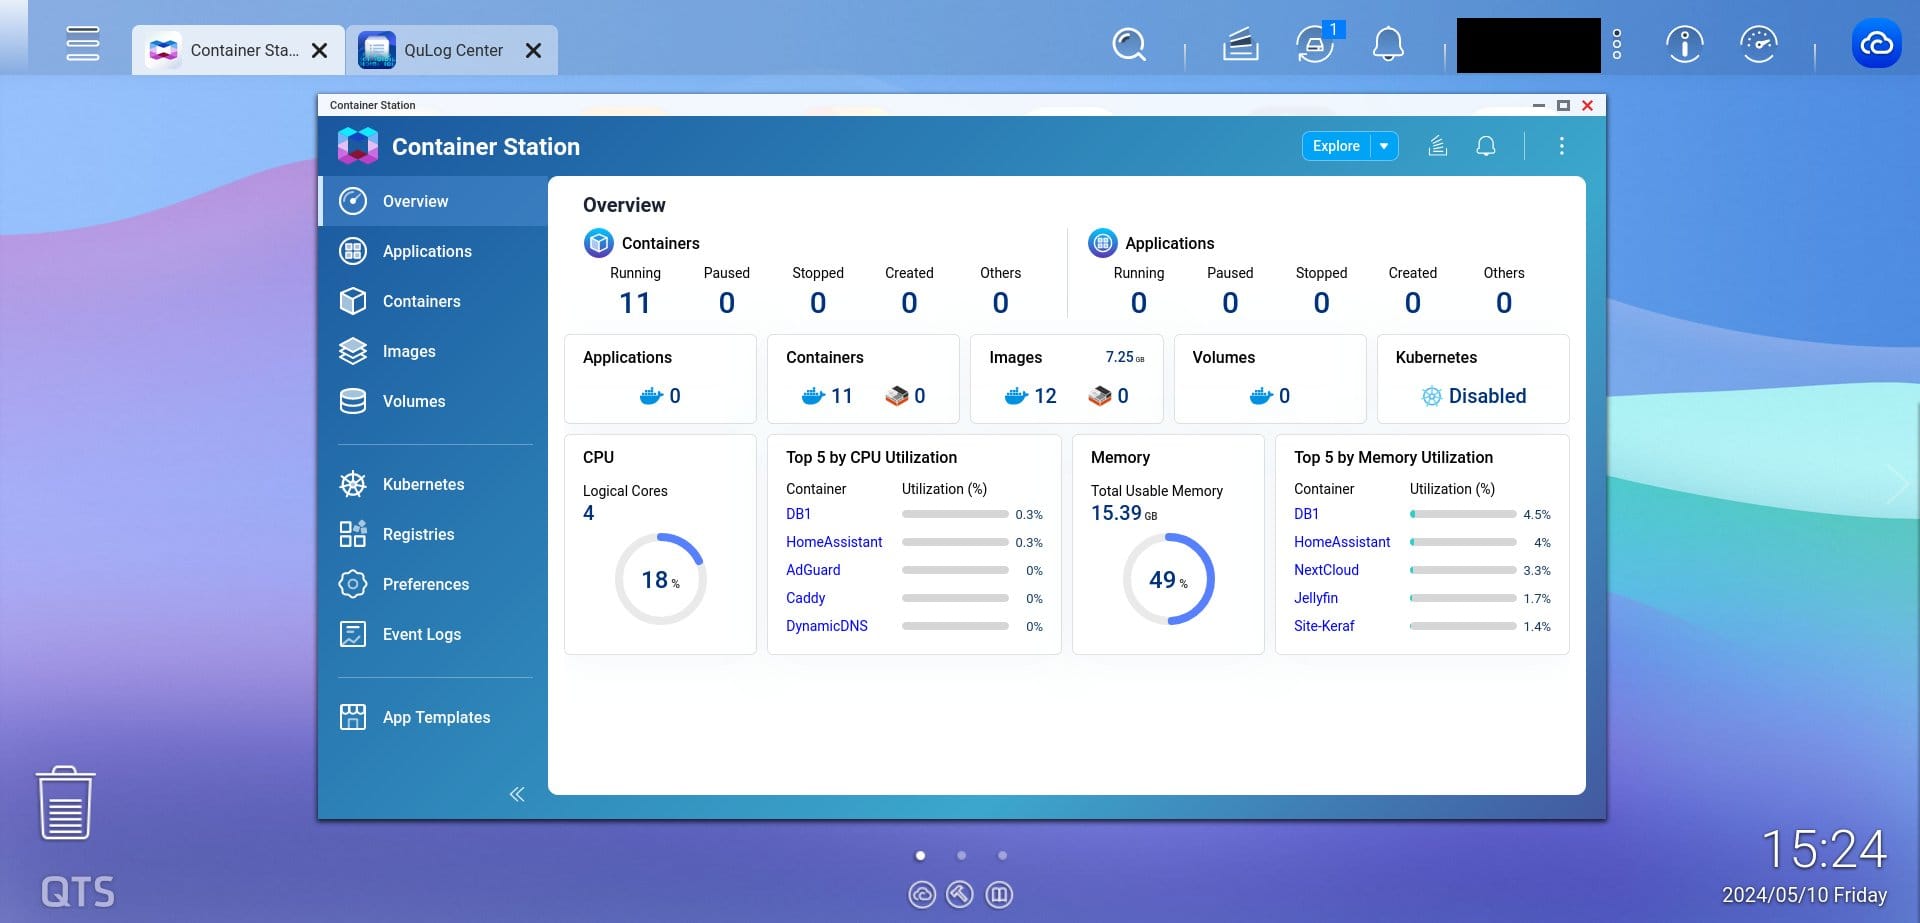
All remaining services are running on the NAS, mostly as Docker containers but some have been installed natively. The choice of Docker vs native mainly came down to whether the application was available as a QPKG and specific needs that would be too cumbersome to setup via QNAP’s Docker interface, Container Station. There’s always the possibility to do things manually but I prefer going the official route with the provided GUI, especially since it has gotten a lot better with its latest updates.
The system that ties together the whole smart home is obviously the excellent Home Assistant that I run as a Docker container. A bit of hackery was necessary to make it work with it’s USB Zigbee stick SkyConnect, but overall it has been really reliable. Running it on the NAS was my preferred options versus the common Raspberry Pi setup, which is less performant and likely to run into SD card issues.
I have also installed NextCloud to share contacts, calendars and files across my family. Pictures on their devices are uploaded automatically and some calendars are shared with Home Assistant for automation and display. NextCloud also records my position at regular intervals using PhoneTrack to visualise my track, it serves no real purpose apart from satisfying my map nerd thirst.
What is a NAS without a good media centre? As a long time Plex user, it seemed like the obvious choice but recently I kept seeing people recommending Jellyfin on r/selfhosted. I gave it a try and never looked back. With a Google TV application available, it makes watching movies and show seamless on both TVs in the house. I especially enjoy the group feature to watch medias in sync with my partner when we’re far from each other, no more waiting to sit next to each other to watch a new season of a show!
I also decided to migrate my blog (this one) and photography website running on Ghost on this machine. The low volume of traffic I get in addition of having a machine already running 24/7 didn’t make it worth to keep paying for a VPS, these aren’t critical websites anyway. I set up a Cloudflare proxy as an extra layer of protection as these are public resources.
To access all my applications from the outside, I simply set up Caddy as a reverse proxy. The configuration and maintenance is very low effort, performance wasn’t really a must as I don’t expect any high volume of traffic. Given that I have a dynamic IPv4 from my ISP, the static one being reserved for business customers, I set up a dynamic DNS service called Inadyn that periodically checks for changes to my IP and updates the records.
Other applications running include Redis, MySQL and Mosquitto, used my one or multiple services mentioned previously. But most importantly, I run Duplicati to make backups on a remote server. It’s really easy to use and offers a lot of functionality, such as encryption or the possibility to run bash scripts before and after the backup. That last functionality is particularly useful given that I sometimes need to execute commands on a container before starting the backup process.
Control, monitoring and automations
Home Assistant allows you to do A LOT. Home automation can be really addictive and I quickly found the urge to add everything I could to it. Official integrations offer a wide support counting over 2700 of them, but it doesn’t stop there. HACS, the community store, offers integrations for anything you can imagine. Ok, all that hardware and software is beautiful, but what does it actually do?
Having Somfy awnings and shutters, it was relatively easy to add them to HA using their Tahoma device. It has a good official integration and allows more precise control than the normal remote would. You can set the exact height and even angle of the blinds. It also reports the current state albeit slow (takes about 15 seconds to update, making you wonder if it actually started moving or not). I set this one up using the Homekit Controller to not rely on the cloud.
Each bedroom is equipped with a Hue ceiling lamp, humidity and temperature sensor, and a sensor to detect whether the window is opened or not. All of these are connected via Zigbee. The lamps being wired also act as a Zigbee router, extending the mesh across the house. The living room also has two lamps connected to Sonoff Zigbee (ZBMINI) devices inside the wall.
Being able to control the lights and blinds allows for some pretty cool presence automation when nobody is at home. The custom integration presence simulation is pretty neat as it uses your usage history from the past days to mimic it when enabled. The simulation is automatically toggled when nobody is home.
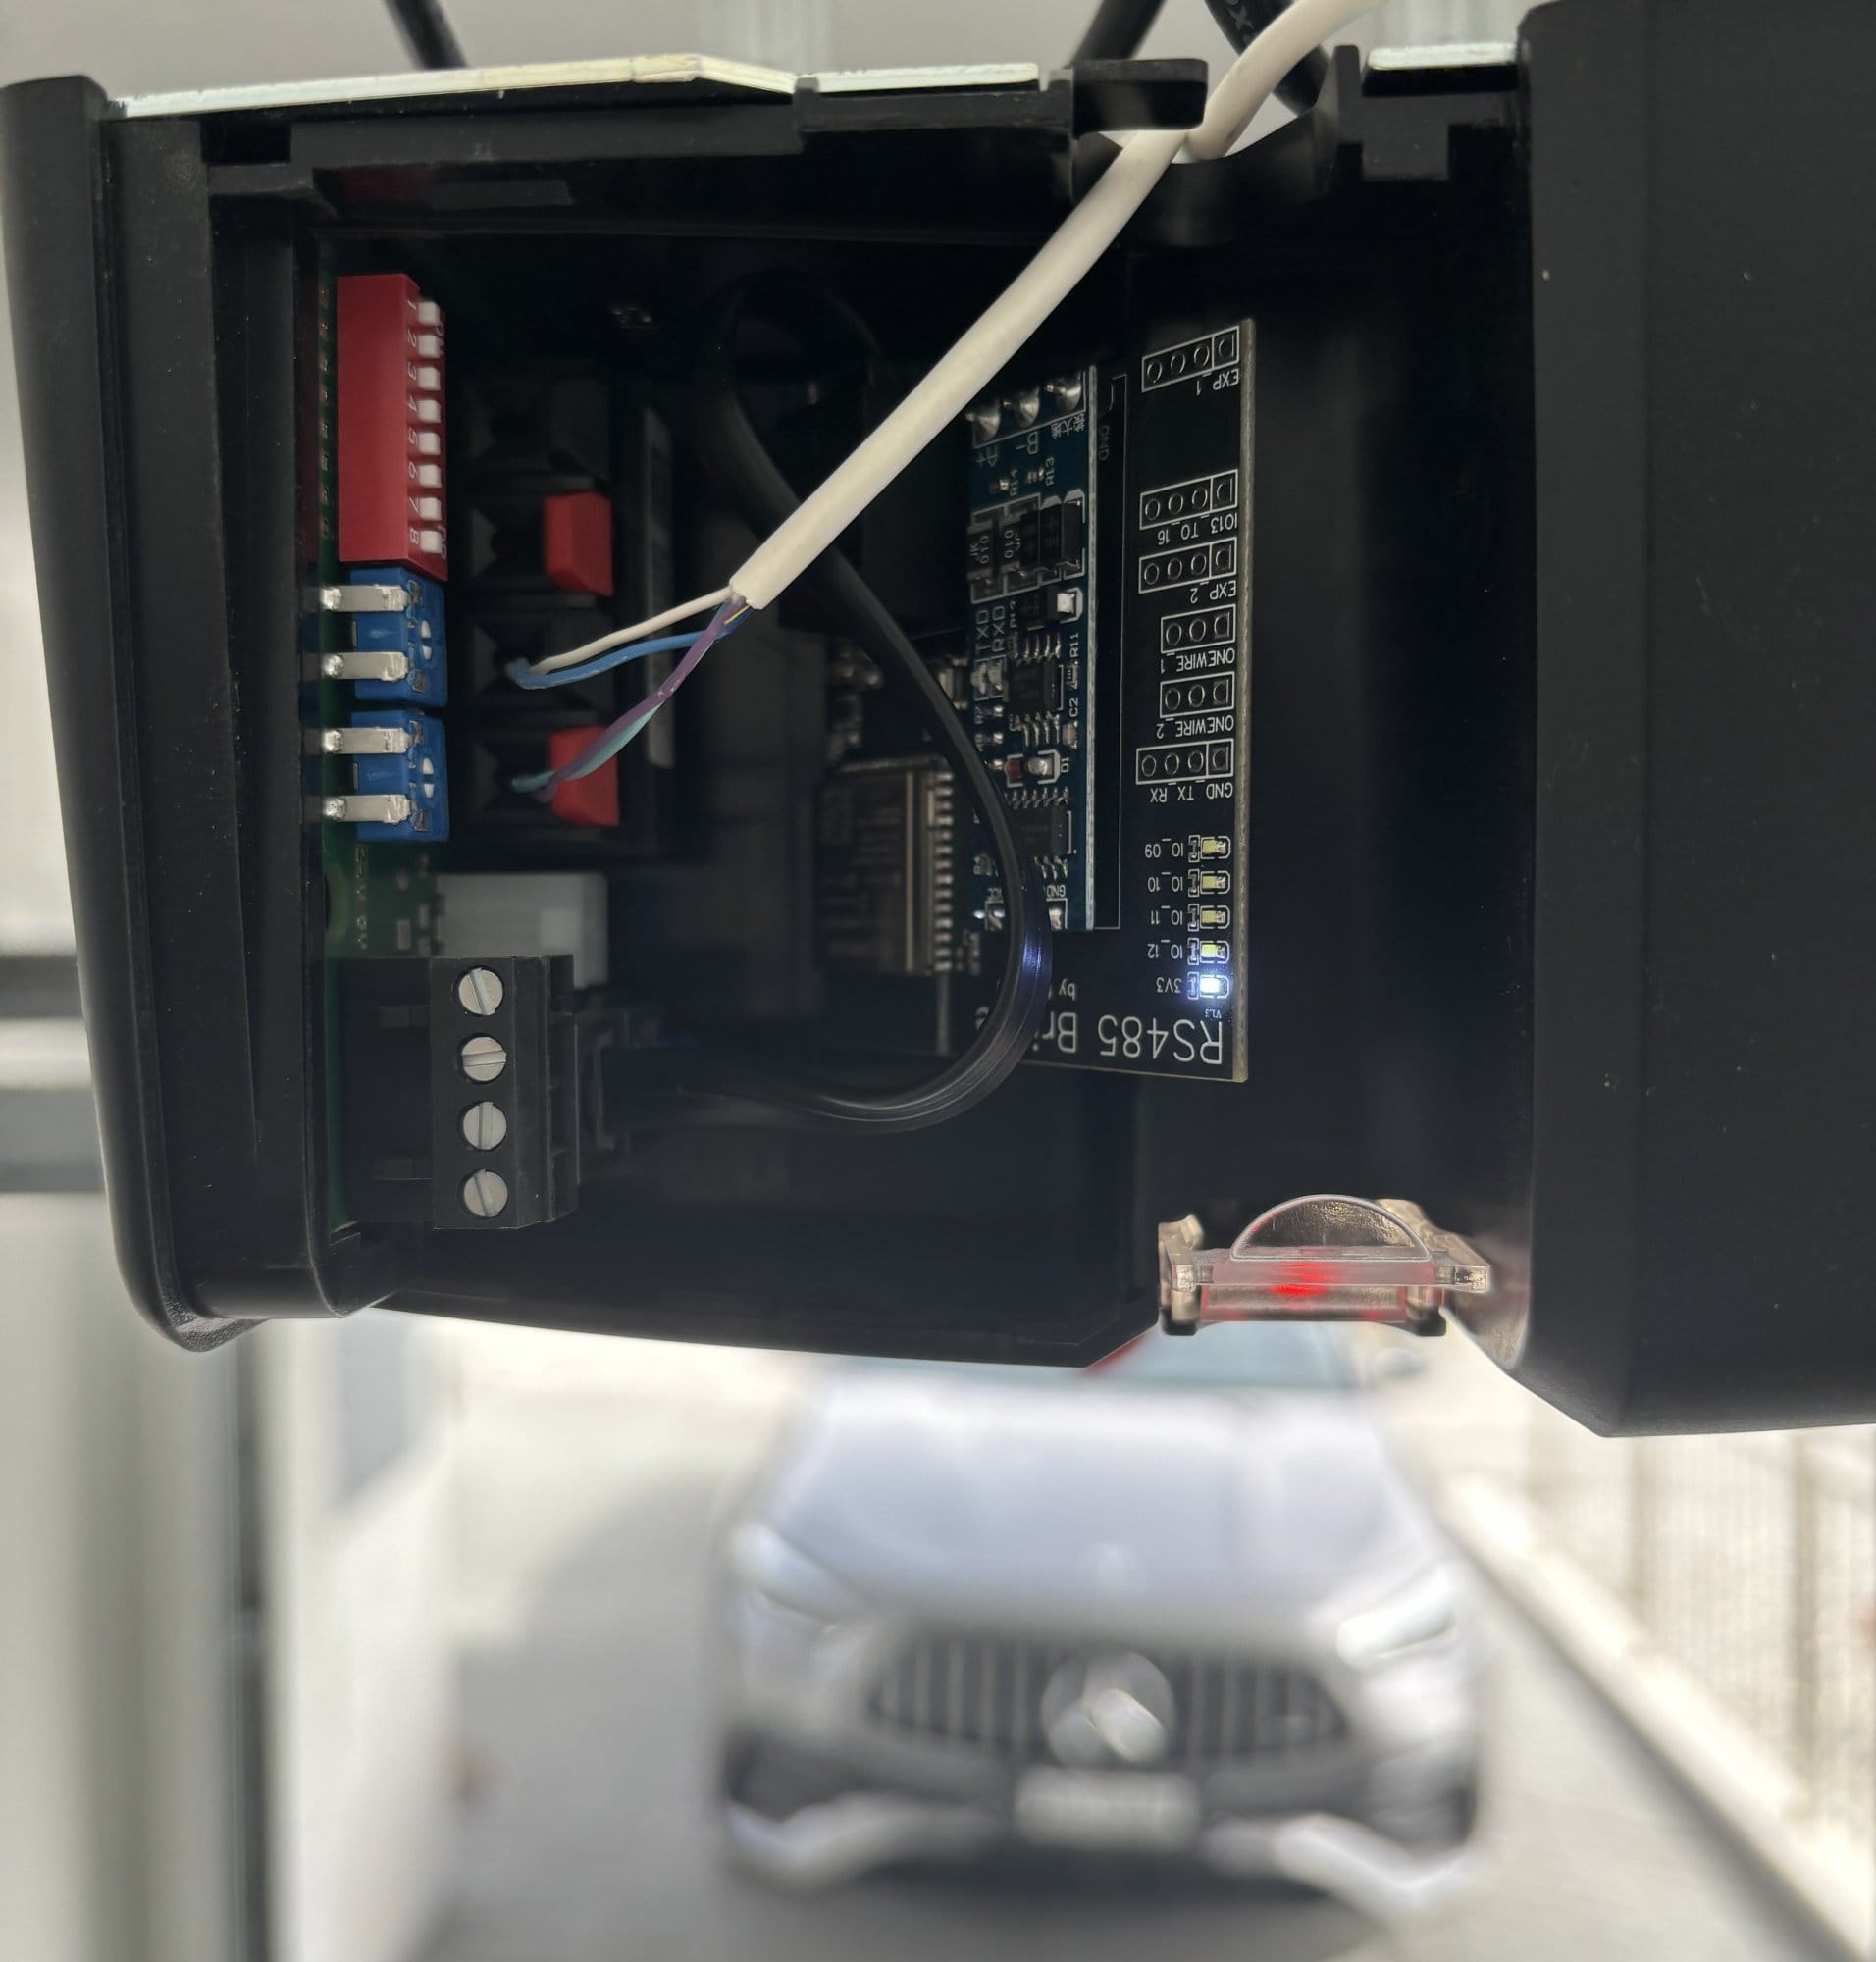
The garage door uses an electric Hörmann motor. Being able to open or close it automatically as the car approaches or leaves was the initial idea but the connectivity add-on from the manufacturer was as ridiculous as its price. A lousy Bluetooth controller for 200 CHF with no Home Assistant support, no thanks. Instead, I found a ready made board and firmware on the HA forums to hook up the garage door to the home automation setup via Wi-Fi and MQTT for the sum of 40€. I’ll be writing a full article on that set up soon.
There are many other entities I added to Home Assistant such as monitoring for the NAS, network and printer using the QNAP, Unifi and IPP integrations. This can also send me notifications via a Telegram bot to preventively resolve issues, like the disk space getting too full or the ink running low. I managed to add the car via the Mercedes Me custom integration, which can help trigger automations based on its location.
To monitor and interact with the home, all members of the family have the HA app installed on their device, allowing them to access it on the go. For inside the home, there’s the wall tablet. It runs Fully Kiosk Browser, which also has a neat official integration to Home Assistant. The integration makes it possible to do such things as play audio, set the page, switch to an application, and so on. The tablet gives a pretty good overview on all cameras and allows for easy interaction with the door bell. Instead of talking to the person at the door via the app, I created some automations that use pre-configured TTS messages to the doorbell’s speaker.
Conclusion
Despite not being perfect, this setup more than satisfies our needs. For a reasonable amount of money, my parents get a fast, reliable and modern network with useful applications. On top of that, with the power of the NAS, I get to self-host pretty much for “free”.
There are two parts though where I’m not entirely happy.
The first one being that there are still a couple of points of failure. Being not very close to my parents, it would be difficult to intervene quickly if anything goes wrong. I threw in a UPS to minimise issues linked to power cuts. Or picked a NAS with hot swappable HDDs instead of the Raspberry Pis I had laying around to host applications, avoiding some of the frequent issues Pis have such as SD card corruptions. I also chose Unifi appliances which have pretty convenient tools to remotely manage your network such as mobile apps, allowing me to quickly troubleshoot issues on the go. I explained to my parents how to handle certain things if I ask them to do it such as replacing a failed hard drive on the NAS. But there are some issues I could not troubleshoot remotely and they would not know how to resolve even with my assistance.
Spending more money could have added more redundancy but at this point, it wouldn’t be reasonable. My parents can live with some down time. What I host on this machine can live with some down time. It’s not critical and everything that is connected to the home automation system has another way to control it. The light? They have a wall switch. The garage? There are multiple remotes. The blinds? Also remotes. The likelihood of the system going down is low but not zero. If it happens, there will be the annoyance of the home controls not being available remotely or automations not working such as the garage door closing automatically when the car drives away from home. It’s not the end of the world and we are fine with it.
The second part is my rant about some of the hardware I bought for this project. I would have maybe done some things differently.
Starting with the door bell (Unifi G4 Doorbell) being a Wi-Fi model. Before putting a repeater near the door, the signal was dropping constantly. Now it’s a lot better but not perfect, there are still packet losses. I wish I would have gone for the Pro PoE model. The more reliable signal would have also spared me the extra wired camera to cover the entrance.
I purchased the network add-on card for the UPS, hoping it would provide extra functionality for waking devices after shutdown. Unfortunately, in addition of being poorly documented, it lacks in features and reliability. I monitor the status of the UPS via the Serial/USB port connected to my NAS at the moment which does its job. I wanted to do it via SNMP but it’s extremely flaky, most of the time I cannot reach the interface. Could have saved about a 100 CHF there by not buying that card.
I already complained about the Unifi software missing some functionality on my Dream Machine. I considered alternatives such as Mikrotik but really dislike their software despite being very featureful and affordable. I looked at DIY solutions such as buying a micro PC and running OPNSense or IPFire on it, but the cost saving and few functionalities I was gaining versus the time involvement just wasn’t worth it. On top of that, I also needed to handle video recording and the combo of Unifi cameras with the Dream Machine was just too good not to take advantage of. Overall I’m quite happy with the Unifi stuff I bought even with the small grudges I have with it.
Lastly, the QNAP NAS. It’s a great piece of hardware but the software is really not that great. Most of the OS features are neat and QNAP’s own software works decently, but all third party packages on their system and application store are lacking and outdated. Thankfully the MyQNAP.org repo has a lot of good up-to-date packages available and Docker also comes to the rescue (which I believe is why QNAP has been focused on updating their Docker GUI, Container Station). For what I was looking for, the TS-464eU ticked all the boxes. Synology had a similar alternative but I wasn’t really satisfied with its specs compared to the QNAP one. I considered the DIY route with the excellent TrueNAS and Supermicro hardware, but at the end it wouldn’t really be that much more cost efficient and would have required more work. At the end, it’s still a really good device and it runs everything I want to run well.
TL;DR - The list with links
If you just skipped the entire blabla above, here’s a list. None of the links are sponsored or lead to a store page, just pure specs and info.
Hardware
- Router: Unifi UDM SE
- Switch: Unifi USW Pro 24
- Access Point: 2x Unifi AC LR
- Cameras: 3x Unifi G4 Bullet, Unifi G4 Doorbell, Unifi G5 Flex
- UPS: PowerWalker VI 2200 RLE
- Server: QNAP TS-464eU (Model), 16GB (RAM), 4x 4TB RAID 5 (HDD), 2x 1TB RAID 1 (SSD), Home Assistant SkyConnect (USB Zigbee)
- Tablet: Samsung Galaxy Tab A8 with Displine wall mount
Software
- Home Assistant (Home automation)
- NextCloud (File sharing)
- Jellyfin (Media center)
- Adguard Home (Ad blocker / DNS server)
- Ghost (Blog CMS)
- Inadyn (Dynamic DNS)
- Caddy (Web server / Reverse proxy)
- MySQL (Database)
- Redis (Database)
- Mosquitto (MQTT)
- Duplicati (Backup)
- Tailscale (VPN)
- Fully Kiosk Browser (Tablet app)